Do you worry that a database migration may cause a data migraine? Do not be frightened; numerous helpful services and approaches may save you from going insane when you hear about migrations. But first, before we get into the specifics, what is database migration, and why do businesses need it?
Database Migration
An enterprise’s data ecosystem consists of a wide range of applications. A company may eventually move away from a current database to save costs, improve reliability, attain scalability, or accomplish any other goal.
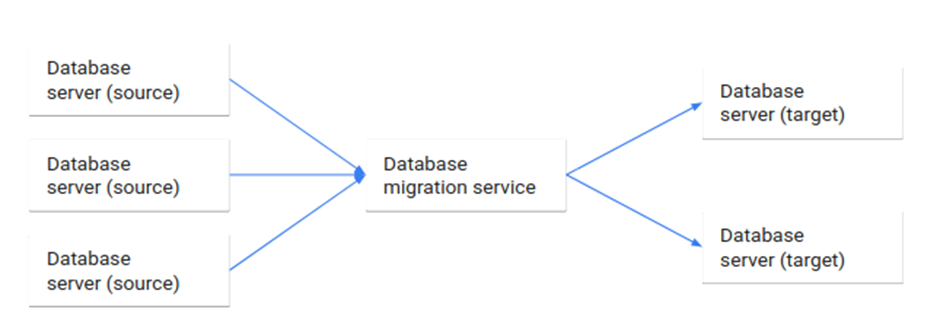
Database migration is the process of migrating data from one or more source databases to one or more target databases by using a database migration service. When a migration is finished, the dataset in the source databases resides entirely, though possibly restructured, in the target databases.
Businesses migrate their databases for the following typical reasons:
- Upgrading to the latest version of the database software to improve security and compliance.
- Moving existing data to a new database to reduce cost, improve performance, and achieve scalability.
- Moving from an on-premise database to a cloud-based database for better scalability and lower costs.
- Merge data from several databases into a single database for a unified data view post-merger.
Database migration services are used to conduct the database migration, and There are several tools you can consider for database migration. The service we’ll be focusing on is AWS DMS (Data Migration Service).
AWS Database Migration Service
AWS Database Migration Service (AWS DMS) is a managed migration and replication service that helps move your database and analytics workloads to AWS quickly, securely, and with minimal downtime and zero data loss. AWS DMS supports migration between the 20-plus database and analytics engines, such as Oracle to Amazon Aurora MySQL, MySQL to Amazon Relational Database (RDS) MySQL, etc.
This blog specializes in cross-account database migration and provides the necessary instructions and workarounds for common AWS DMS database migration problems.
Migration options provided by AWS DMS
- Full load (Migrate existing data) – This option is a good choice if you can afford an outage long enough to copy your existing data. This option migrates the data from your source database to your target database, creating tables when necessary.
- Full load + CDC (Migrate existing data and replicate ongoing changes) – This option performs a full data load while capturing changes on the source. After the entire load is complete, captured changes are applied to the target. Eventually, the application of changes reaches a steady state. You can shut down your applications, let the remaining changes flow through to the target, and then restart your applications by pointing at the target.
- CDC only (Replicate data changes only) – In some situations, copying existing data might be more efficient using a method other than AWS DMS. For example, in a homogeneous migration, using native export and import tools might be more efficient at loading bulk data. In this situation, you can use AWS DMS to replicate changes starting when you start your bulk load to bring and keep your source and target databases in sync.
Cross Account Database migration using AWS DMS
For customers who use multiple AWS accounts, the source and target databases may exist on different accounts. For AWS DMS to work with source and target databases in different accounts, it must be able to communicate across accounts.
The following are some of the options you can use to enable cross-account AWS DMS communication:
- Making database endpoints accessible over the Internet
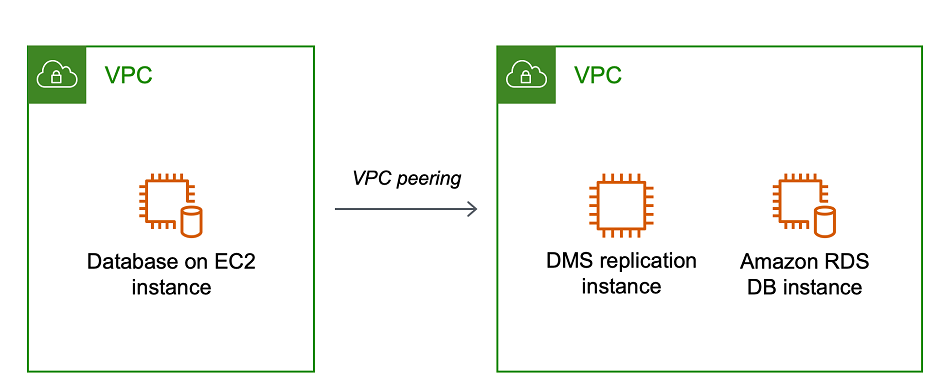
- Virtual Private Cloud (VPC) peering
- Whitelisting the AWS DMS public IP in the security group
This blog will outline the necessary steps to accomplish database migration using AWS DMS with Amazon RDS for PostgreSQL as a source database and Amazon Aurora as a target. We will be using VPC peering to communicate across the accounts.
On a higher level, the steps would be as follows:
- Creating a VPC Peering connection between the target (Amazon Aurora) and source (RDS for PostgreSQL) VPCs
- Creating DMS Replication Instance (EC2) inside the Target VPC
- Creating DMS Replication Source Endpoint for Amazon RDS for PostgreSQL and
Target Endpoint for Amazon Aurora
- Creating the DMS Replication Task
- Executing the replication task to perform the migration
Creating the VPC Peering between Source and Target Account
This link provides detailed information about creating a VPC Peering connection. The VPC peering connection enables the two VPCs to route traffic between them using private IPv4 addresses or IPv6 addresses. It is important to note that the CIDR blocks between the VPCs must not overlap.
Source and target VPCs details:
- VPC (Requester): ID of the VPC in the target account.
- Account: Select the “Another account” option and enter the Account ID of the source account.
- Region: Select “Another Region” and select the region of the source Account.
- VPC ID (Accepter): enter the VPC ID of the VPC where the source database is located.
After creation, navigate to the accepter VPC and accept the pairing request.
Usually, an AWS DMS replication instance uses the Domain Name System (DNS) resolver in an Amazon EC2 instance to resolve domain endpoints, so make sure that DNS resolution is enabled.
To enable private IPv4 traffic between instances in peered VPCs, you must add a route to the route tables associated with the subnets for both instances. It can be done as follow or follow this link:
- Navigate to Route Tables
- Select the route tables associated with the database and choose Actions > Edit Routes
- Press “Add route” and enter the destination VPC’s CIDR range under Destination, and as Target, choose “Peering Connection” and select the connection we’ve just created.
It’s time to configure the AWS DMS service now that the peering between VPCs has been completed.
Setting up the AWS DMS Replication Instance
At a high level, an AWS DMS replication instance is simply a managed Amazon Elastic Compute Cloud (Amazon EC2) instance that hosts one or more replication tasks. If your source and target endpoints are in different VPCs, you can create your replication instance in one of the VPCs.
To create a replication instance, please follow the official documentation and pay attention to the following things:
- To choose the right instance for the replication, visit this link.
- Give the instance a useful name and description
- Enable or disable public accessibility based on your needs
Once created, the private (we have configured a private instance) instance will have an IPv4 address associated. Note down this address, and let’s modify both the database’s Security Groups to allow access from the Replication Instance to the databases.
- Navigate to the Security Groups associated with the database
- In the inbound rules, under the Type dropdown, select either source/target database.
- Enter the private IPv4 address under source followed by
/32(e.g.,10.11.12.13/32). - Provide a logical Description
The Replication Instance should now be able to access both databases properly.
Creating the DMS Database Endpoints
An endpoint provides connection, data store type, and location information about your data store. AWS Database Migration Service uses this information to connect to a data store and migrate data from a source endpoint to a target endpoint.
This link provides complete information on creating endpoints.
Consider the following information when creating the Source/Target Endpoints:
- Select Source/target endpoints
- Select the RDS DB Instance option because we are using Amazon RDS for PostgreSQL
- Enter the database credentials under Access to endpoint database > provide access information manually
Review these official AWS documents before configuring Amazon RDS for PostgreSQL as a source Endpoint.
Make sure to test the connections after the Endpoints have been created.
Creating the DMS Database Migration Task
Now, it’s time to create the AWS DMS task. Navigate to the Database migration task option in the AWS DMS dashboard and choose the create task option from the menu.
In the Task configuration section, fill in the required boxes with the following information:
- Unique Identifier for the AWS DMS task.
- The replication instance that we created.
- The source and target endpoints that we created
- Select “Migrate existing data and replicate ongoing changes” (depending upon your requirements).
In the Task settings mode, choose the JSON editor for table selection and mapping rules. Table mapping uses several rules to specify the data source, source schema, data, and any transformations that should occur during the task. You can use table mapping to specify individual tables in a database to migrate and the schema to use for the migration.
Choose “Manually later” under the migration task startup configuration before creating the task.
Executing the Migration Task
To start the execution of the migration start, select the task created from the menu, and from “Action” select Run.
To gain insight into the migration task’s details, either select the migration task’s details or click the Quick view and compare option. Enable CloudWatch logging on the task for detailed logs.
Common Issues with AWS Database migration service
AWS DMS creates tables, primary keys, and sometimes unique indexes, but it doesn’t create other objects that aren’t required to efficiently migrate the data from the source. For example, it doesn’t create secondary indexes, non-primary key constraints, or data defaults. Below we are discussing some issues related to migration and some quick workarounds.
Foreign key constraint violation:
By default, AWS DMS tasks load eight tables simultaneously during the full load phase. These tables are loaded alphabetically by default unless you configure the loading order for the task. If the load order isn’t configured to load parent tables first, a child table might be loaded before its parent table. This causes the task to fail with a foreign key constraint violation.
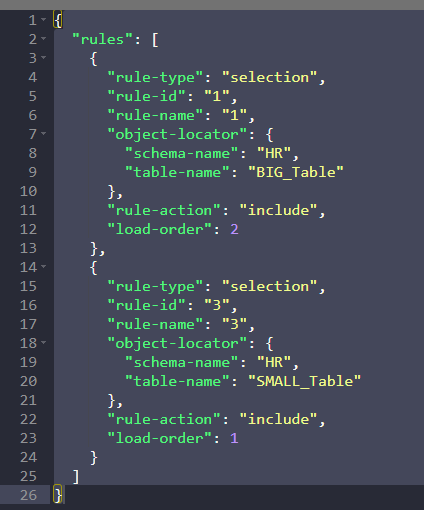
Solution: we can solve this issue by controlling the order in which the tables are loaded. With DMS version 3.1.2, you can control the order in which tables are loaded. This is supported using a new attribute of the selection rule called load-order. It’s allowed only for the rule-action included, and you should specify a non-negative number. Zero is a default; the maximum is 2147483647 for the load order. Tables with higher load-order numbers begin loading before tables with lower load-order numbers.
For example, if you want to load two tables named BIG_TABLE and SMALL_TABLE in a particular order, you can control this using the load-order attributes in the task JSON as specified below. So, in this example, the table BIG_TABLE with load order 2 is loaded before table SMALL_TABLE with load order 1.